👋 Introducing Unit Tests with Swift Testing 🧪

Forget about Ruby and Fastlane installation issues!
Discover Codemagic CLI Tools - the free, open-source Fastlane alternative for automating iOS builds, code signing and publishing.
This message is brought to you by a sponsor who helps keep this content free for everyone. If you have a moment, check them out — your support means a lot!
Welcome to issue #41 of the iOS Coffee Break Newsletter 📬 and to the 5th issue of the "Building a Newsletter App" series!
Last week, I discussed implementing error handling by defining an APIError enum to represent different error types.
This week, I will demonstrate how to test my IssuesViewModel using Apple's new Swift Testing framework.
This modern and expressive API simplifies writing tests while Xcode's improved interface provides clearer feedback on test results, making debugging and maintaining code more efficient.
The Plan
In a previous issue, I introduced 3 different implementations of the IssuesRepository protocol, each designed for specific scenarios.
This time, I will use those implementations to test my IssuesViewModel under different conditions. Here is what I am covering in this week's issue:
- Testing the
IssuesViewModelwithIssuesSuccessMockRepository. - Testing
IssuesViewModelwithIssuesEmptyMockRepository. - Testing
IssuesViewModelwithIssuesFailureMockRepository.
Integrating Swift Testing into an Existing Project
If you are new to testing, you have nothing to compare from, however, if you are familiar with XCTest, the Swift Testing framework introduces some changes. Adding a Swift Testing based test to your project is simple. If you already have a test target, just create a new Swift file, import the Testing framework and start writing your tests.
Writing Tests for IssuesViewModel with Success Data
In this file, we will test how the IssuesViewModel behaves when our repository successfully returns data.
This ensures that the view model correctly processes and presents the fetched issues.
import Testing
@testable import iOS_Coffee_Break

class IssuesViewModelSuccessRepositoryTests {
    private var issuesRepository: IssuesRepository!
    private var vm: IssuesViewModel!

    init() {
        issuesRepository = IssuesSuccessMockRepository()
        vm = IssuesViewModel(issuesRepository: issuesRepository)
    }

    deinit {
        issuesRepository = nil
        vm = nil
    }

    @Test("Test successful response")
    func test_successful_response() async throws {
        #expect(!vm.isLoading, "The view model should not be loading any data.")
        await vm.getIssues()
        #expect(!vm.hasError, "The view model should not have errors.")
        #expect(vm.error == nil, "The view model should not have errors.")
        #expect(vm.issues.count == 2, "There should be 2 elements within our issues array.")
        #expect(!vm.isLoading, "The view model should not be loading any data.")
    }
}
Notice the test I just showed is essentially a function with a @Test macro applied to it!
In the example above, I defined the init function within IssuesViewModelSuccessRepositoryTests.
The Swift Testing framework automatically calls this function before each test, allowing us to set up necessary dependencies like a database connection or initialize mock data.
Since I am using a class-based test suite, the deinit function helps reset the IssuesRepository dependency after each test.
You can think of deinit in Swift Testing as the equivalent of teardown() in XCTest, ensuring a clean test environment for every run.
Writing Tests for IssuesViewModel with Empty Data
In this file, we will verify how the issues view model behaves when our repository dependency does not return any data.
import Testing
@testable import iOS_Coffee_Break

class IssuesViewModelEmptyRepositoryTests {
    private var issuesRepository: IssuesRepository!
    private var vm: IssuesViewModel!

    init() {
        issuesRepository = IssuesEmptyMockRepository()
        vm = IssuesViewModel(issuesRepository: issuesRepository)
    }

    [...]

    @Test("Test empty response")
    func test_empty_response() async throws {
        #expect(!vm.isLoading, "The view model should not be loading any data.")
        await vm.getIssues()
        #expect(!vm.hasError, "The view model should not have errors.")
        #expect(vm.error == nil, "The view model should not have errors.")
        #expect(vm.issues.count == 0, "There should be 0 elements within our issues array.")
        #expect(!vm.isLoading, "The view model should not be loading any data.")
    }
}
Writing Tests for IssuesViewModel with Failure Scenarios
In this file, we will validate how the issues view model handles situations where the repository throws an error.
import Testing
@testable import iOS_Coffee_Break
class IssuesViewModelFailureRepositoryTests {
private var issuesRepository: IssuesRepository!
private var vm: IssuesViewModel!
init() {
issuesRepository = IssuesFailureMockRepository()
vm = IssuesViewModel(issuesRepository: issuesRepository)
}
[...]
@Test("Test failure response with .failedToDecode error")
func test_failure_response_with_failedToDecode_error() async throws {
#expect(!vm.isLoading, "The view model should not be loading any data.")
await vm.getIssues()
#expect(vm.hasError, "The view model should have errors.")
#expect(vm.error == APIError.failedToDecode, "The view model should have an .failedToDecode APIError.")
#expect(vm.issues.count == 0, "There should be 0 elements within our issues array.")
#expect(!vm.isLoading, "The view model should not be loading any data.")
}
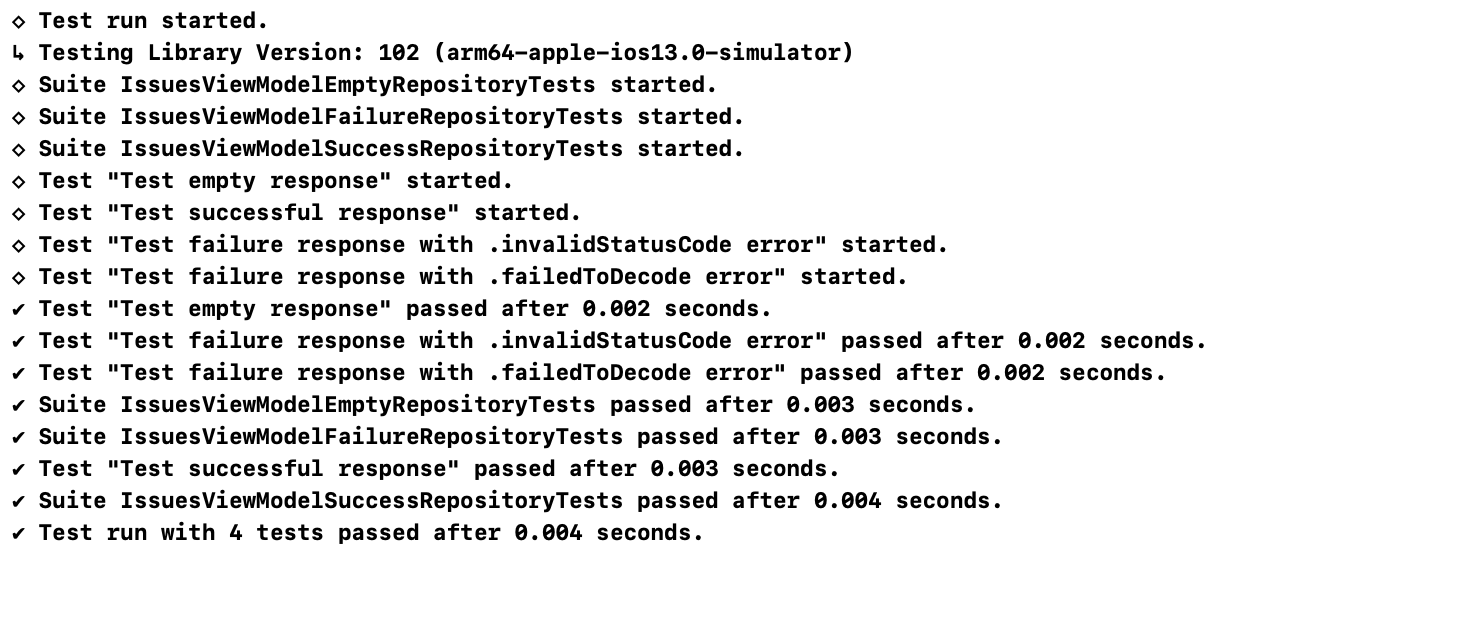
}Output
Each time you run the tests, the console will display a clearer and more readable output, making it easier to interpret the results:
🤝 Wrapping Up
And with that, we have seen the basics on how to implement tests using the Swift Testing framework. I personally prefer this new way of writing tests and I think it makes testing in Swift much more enjoyable and intuitive.
Next week, I am planning to implement the detail view of an issue. Stay tuned for the update!
By subscribing to the newsletter, you will get access to the code.
CURATED FROM THE COMMUNITY
📦 Introducing Swiftly 1.0
Although the latest Swift version comes included with each Xcode release, there are scenarios where you might want to install Swift separately — without using Xcode. A common case is setting up Swift on systems where Xcode is not available, like on Linux.
That is where swiftly comes in — a tool created by Apple for exactly this purpose. While it has been available for some time, Apple officially released its first stable version (1.0) just two weeks ago, now with support for macOS.
⬆️ Bump app version and build number using Fastlane
Have you ever gone to submit a new TestFlight build, only to realize at the very end that you forgot to update the version or build number?
In his latest post, Noam shares how to automate this step using Fastlane. It is a super handy way to avoid those last-minute slip-ups and save time every time you push a new build.
🔍 How to inspect .ipa files and secure your iOS app from common mistakes
Do you ever wonder what is inside your favorite iOS app? Which third-party frameworks are used? What hidden resources are added to the app bundle?
In this guide, Artem walks you through inspecting .ipa files and digging into their internal contents.
He also points out common security mistakes and shares three key tips to help you keep sensitive data safe.
If you have never taken a look at your own app's .ipa, this article might just be the push you needed to start!